Showing posts with label Martha Stewart. Show all posts

7.13.2010

Cookbook Review: Martha Stewart Cupcakes

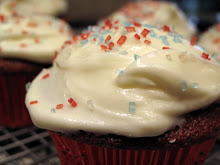
We were invited to a BBQ this past Fourth of July and I contributed by whipping up some Red Velvet Cupcakes with Red, White and Blue Sprinkles on top. They were major YUMM-OO I got the recipe from Martha Stewart's Cupcakes Cookbook. They were easy to make, came out great and were very tasty.

Finally I have an audience for my "cooking shows"


6.10.2010

everyday food challenge

I saw yesterday on the Martha Stewart Everyday Food Blog that a fellow blogger is hosting his own challenge of making at least one recipe once a week from EVERY issue of the Everyday Food Magazine. One of my favorite magazines as well. He has every issue - I'll have to check I think I do too. I'm really going to enjoy watching/reading his posts as he progresses thru this culinary journey and it may inspire me to come up with my own cooking challenge. You can follow along with Mike over at his blog, click here. Enjoy.

4.20.2010

Martha Stewart = Art

Personally I think the covers of Martha Stewart Living are works of art, have you seen the lastest issue it's stunning. I love the summery colors, someday I will have a wall dedicated to Martha Stewart Living Magazine covers.
Posted by Picasa

2.22.2010

Are you Martha Stewart Clean?

So are you Martha Stewart Clean? Well if you're not, now you can be. LOL With her new line of Martha Stewart cleaning products at The Home Depot. I picked up the Dish-Hand Soap and one of the all-purpose cleaners she has and will report back to you how I like them. I'm sure you can already guess if I'll like them or not. The line seems really good and covers everything from floors, to clothes to dishes. Pretty cool! Have fun cleaning!

2.18.2010

Ribs!

For the Superbowl I tried a new recipe for ribs that I saw Emeril make with his son on the Martha Stewart Show recently. The recipe couldn't be easier and couldn't be tastier. I was not able to find Emeril's BBQ sauce that he recommends in the recipe so I tried a Jack Daniels BBQ and it was good but that's the only aspect of the recipe that I can see changing around a bit is the sauce you can experiment with that until you find one you like and lord knows there are a million out there. What I loved about this recipe was how easy it was to make it. The only thing it really requires is time. You have to bake the ribs for 3 hours with just the rib rub on so that takes being home for that period of time at least but it worked out great for us on Superbowl Sunday I was able to start the ribs and get everything done around the house I needed and then the ribs were ready when the party started. You can find the recipe here if you're interested in making them yourself, which I highly recommend!


Here's the finished product. They were so good and the meat was falling off the bone!


Here's the process. Take your slabs of ribs and rub them with Emeril's Rib Rub and then make a pocket out of parchment paper and aluminum foil for them to bake in.


closeup.

then after the 3 hours in the oven take the ribs out and lightly coat them all over with the BBQ sauce, then put them back in the oven uncovered for about 30 minutes.


mmmmm mmmm good.

1.13.2010

Project Wednesday: Calendar 2010

What a great New Year Project.
I am always making calendars, lately I've been making the kind of calendar that can fit in a CD case but recently I saw in the Martha Stewart Living Magazine this "Good Thing" a calendar using clip art that she provides on her website and hanging it from a 5x7 picture frame. Genuis! I love these frames from Ikea, they are so cheap and for me they are a nice thing to have on hand.

So here's a quick step by step - start with the frame.


measure and mark were you want to hang the hooks from to hand the calendar on the frame.


I made small holes in the frame with a nail and hammer so it would be easier to screw in the hook.

use cup holder hook
then screw in the hook.


print out the calendar clip art and cut it to size.
here's all the months printed out and now you can punch holes in them and hang them from the frame.

and the final product, the nice thing is that you can change out the picture whenever you like, but you don't have to fool again with the calendar it's self. Of course for me the part that took the longest was getting just the right picture of Mr. Zico. Once that was accomplished the project was done, probably took me an hour in total. The clip art for the project can be found here. Have fun.

5.12.2009

Carrot Cake Cupcakes

Martha Stewart's Carrot Cake Cupcakes
(from the Everyday Food Cookbook)
Yummooo, this was such an easy and delicious recipe. I plan on making them again and again.


Here's the recipe:

Ingredients
Makes 12.
1 cup granulated sugar
1/3 cup vegetable oil
2 tablespoons orange juice
1 teaspoon pure vanilla extract
2 large eggs
1 teaspoon baking powder
1/2 teaspoon baking soda
1/2 teaspoon ground allspice
1/2 teaspoon salt
3/4 cup plus 2 tablespoons all-purpose flour (spooned and leveled)
1 1/2 cups shredded carrots
1/2 cup chopped walnuts
1/4 cup shredded coconut, plus more for garnish
8 ounces bar cream cheese, room temperature
3/4 cup confectioners' sugar


Directions:

Preheat oven to 350 degrees. Oil a standard 12-cup muffin tin or line with paper liners. In a bowl, combine sugar, vegetable oil, orange juice, 1/2 teaspoon vanilla extract, and eggs.
Stir in baking powder, baking soda, allspice, and salt. Add flour; mix. Stir in carrots, walnuts, and coconut.
Divide batter evenly among muffin cups. Bake until toothpick inserted in centers comes out clean, 25 minutes. Let cool completely before frosting.
Meanwhile, in a mixing bowl, combine cream cheese, confectioners' sugar, and remaining 1/2 teaspoon vanilla extract. Whisk until smooth.
Frost cupcakes, and garnish with shredded coconut.

2.24.2009

Martha Stewart Book Signing

well my dreams have come true. :) I have met Martha Stewart in person. Last week here in Atlanta at the Georgia Aquarium there was a Martha Stewart book signing and of course I was there like a bear. As with most book signings you have to purchase a book in order to get your "ticket" so I purchased the Martha Stewart's Cooking School cookbook again.

I had to wait 3 hours in line to finally get to Martha and have my book signed but it was well worth it. While everyone was waiting in line waiters and waitresses were coming around serving milk and homemade cookies; no doubt recipes from her cookies cookbook. They were filming part of the book signing and some things around the aquarium for an upcoming show on March 5th - I hope I catch a glimpse of myself on TV from that day.

So after 3 hours of waiting I finally got into the room where she was signing the books... I caught my first glimpse of her and just couldn't believe I was finally going to meet her! She is such a class act and even more beautiful in person! I told her how much I've admired her all these years and am an avid fan of her show and she said a sincere THANK YOU to me! AWESOME!!! I still can hardly believe that I finally met her, next would be the opportunity to actual sit down and have a conversation with her. Maybe someday, you never know. It was a great day February 17th and here are my pics from the event:

Here's a picture of the milk and cookies they were serving at the event.

some of the line
some more of the line

notice that they are filming for the show on March 5th!
so beautiful, we were lined up throughout one of the ballrooms at the aquarium and this is part of what you see while you're in that room the beluga whale tank.

oh my goodness there she is!
I'm getting closer.
thank you man behind me for taking this pic of ME and MARTHA!
and there's the signature!

what a day, what an event. I am so happy and excited that I was able to attend this book signing as you can imagine. Martha has also blogged a few times regarding this book signing here in Atlanta check out her blog to read what she thought of the day.

12.21.2008

Peppermint Bark

I have been wanting to make Peppermint Bark for a long time now, just like what they sell in Williams-Sonoma and this year I finally got to it. Of course as in my previous post it did not help that it's so warm here in Atlanta right now but I managed. It's VERY easy and my only change in the recipe (Martha Stewart Recipe) I will make next time is to add peppermint extract to the white chocolate. Here's how it goes:

put the candies in a zip lock bag and beat the heck out of it with a rolling pin or frying pan.

by this point I have already poured out the semi-sweet chocolate and chilled that in the fridge for about 15 minutes and now on top of that pour the white chocolate.
spread the white chocolate out on top of the semi-sweet chocolate


sprinkle the crushed up candy canes on the chocolate

ready to break up into pieces
Williams-Sonoma has competition now. :)

12.16.2008

Bourbon Pecan Truffles

This weekend along with the Orange Pinched Macaroons I tried out a Truffle recipe, I made some last year, but these were much easier and better I think. The recipe came from Martha Stewart's Everyday Food Magazine December 2007 edition and it is YUMMY something you could definitely whip up in a day (starting early) and bring to a dinner in the evening.

Chop up those pecans.


The chocolate has already chilled at this point and I scooped out all the little balls with an ice cream scooper, ready to roll. I have chopped pecans and cocoa powder.


VOILA, there's truffle number one rolled in pecans.


And truffle number two rolled in cocoa powder.
They are DELICIOUS! I have to say I made them Saturday morning and by Saturday night they were GONE.
Here's the recipe:

Ingredients
Makes 35

1 cup heavy cream
1 1/2 cups semisweet chocolate chips (or 10 ounces semisweet chocolate, finely chopped)
2 tablespoons bourbon
1 cup finely chopped pecans

Directions
In a medium saucepan, bring cream to a boil; remove from heat, and add chocolate and bourbon. Let stand 3 minutes; whisk until smooth. Transfer chocolate mixture to a medium bowl, and refrigerate, uncovered, until thick and firm enough to spoon out in mounds, about 2 hours.
Line a rimmed baking sheet with parchment or waxed paper. Drop level tablespoons of chocolate mixture onto baking sheet. Refrigerate chocolate mounds until firm, 30 minutes.
Place pecans in a shallow bowl. Using hands, roll each chocolate mound into a ball; roll balls in pecans, pressing lightly to adhere, and place on baking sheet. Refrigerate truffles until set, 30 minutes to 1 hour. Store in an airtight container in the refrigerator up to 2 weeks.

12.13.2008

Orange Pinched Macaroons

Last week Martha had Pastry Chef Patrick Lemble from the acclaimed Four Season's Restaurant on her show sharing his recipe for Orange Pinched Macaroons. Well they seemed like the perfect cookie for me to try and see if I wanted to add them to my 2008 Christmas Cookie Collection so yesterday I tested the recipe.

They are delicious, but I'm not sure if they will make the cut for this years batch of holiday cookies. They are easy enough to make and they are delicious, I think they are perfect for exactly how the four seasons serves them as a delicious dessert after dinner but not necessarily as part of my cookie gifts. The other "down" side to them if you want to make a lot to give away, although the recipe does make 40 cookies and I think two per person would be a enough, is that you need 1 lb. of almond paste and that is not cheap around $10 for the pound. Now again the holidays are not a time to skimp on delicious ingredients but that's probably the ONLY down side to these cookies.

Here was the process and a few of my comments (helpful tips) in case you make them yourself.

when rolling out the dough into long snakes I suggest using a good amount of powdered sugar on your board because it is a fairly sticky dough. I used a bench scraper to work with the dough and to cut the pieces out. let the pieces that you have rolled in egg white and powdered sugar sit out for about 30 minutes, it seems you do this so that they dry a little and then they're not so sticky when you pinch them.

pinched and ready to go into the oven.

up close shot of the pinched cookies.

out of the oven. yummy and they were a hit with everyone who tried them. Happy Baking.

Related Posts Widget for Blogs by LinkWithin